
Weatherproofing and Sealing Outdoor Camera Installs
A weatherproof outdoor security camera install lives in the weather year-round, and the difference between an install that lasts a decade and one that fails in a season is almost always sealing. The camera itself is sealed at the factory, but every hole you drill, every cable you run, and every connection you make in the field is a potential entry point for water. Get the sealing right and you’ll never think about it again. Get it wrong and you’ll be chasing fogged lenses, corroded connections, and water damage inside your walls. This guide ties together everything about keeping an outdoor install dry — penetrations, connections, the camera body, and the whole-system habits that prevent water intrusion.
This is the capstone of our cabling and mounting cluster. It pulls together details from our guides on PoE cameras for barns and outbuildings and how high to mount security cameras.
Why Sealing Matters So Much
Water intrusion is the leading cause of outdoor camera failure, and it rarely announces itself. A connection corrodes slowly over weeks until the camera drops offline intermittently, then for good. Water gets behind a poorly sealed mount and runs into the wall, doing damage you don’t see until it’s serious. A fogged lens ruins your footage every humid morning. None of it is dramatic — it’s slow, quiet failure that traces back to a seal someone skipped. The good news: every bit of it is preventable with a few minutes of care per camera.
Sealing Wall Penetrations
Every hole you drill through an exterior wall is a water path until you seal it. This is the most important sealing you’ll do.
Angle the Hole Downward
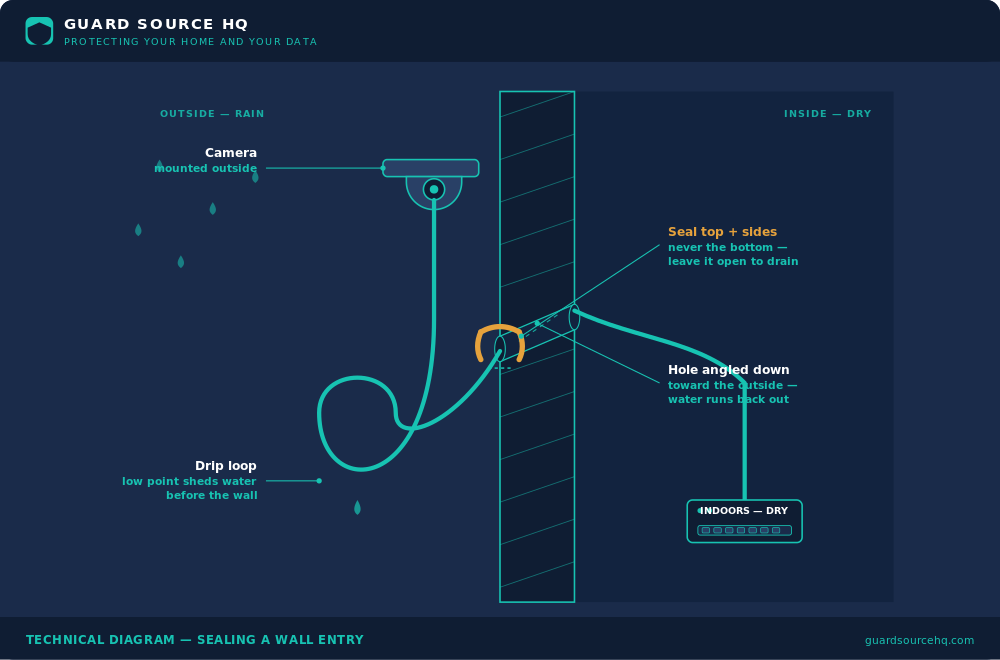
Drill cable pass-through holes angled slightly downward toward the outside. This simple trick means water can’t run along the cable back into the wall — gravity carries it away from the building instead of into it. It’s the kind of habit every tradesman has and most DIYers skip.
Seal the Penetration
After running the cable, seal the hole thoroughly with exterior-grade silicone sealant, or use a proper cable gland (cord grip) that provides a compression seal around the cable jacket. On a flat surface, a generous bead of quality exterior silicone around the cable does the job. Don’t use cheap interior caulk — it won’t hold up to UV and temperature cycling.
Leave a Drip Loop
Before the cable enters the wall, leave a downward loop. Water travels along a cable by gravity and surface tension; the drip loop forces it to drip off at the bottom of the loop instead of following the cable into your penetration. Free, easy, and it prevents a huge share of water problems.
GuardSourceHQ Tip
Leave a drip loop in the cable just before it enters the wall — water follows the wire, and the loop forces it to drip off at the low point.
Sealing the Connection
The field-made RJ45 connection is the most vulnerable point in the whole install. The camera is sealed; this connection is not, unless you seal it.
Use a Weatherproof Junction Box
The cleanest solution is to make the connection inside a weatherproof (IP66+) junction box mounted behind or beside the camera. The connection lives in a sealed, dry cavity, never exposed. Most quality cameras either include or accept a matching junction box.
Seal the RJ45 Itself
Inside the box or out, protect the RJ45 connection directly. Use the camera’s waterproof cap kit with every gasket and collar (the most common failure is people skipping parts of it), or wrap the mated connection in self-amalgamating (self-fusing) silicone tape, which bonds to itself into a seamless waterproof sleeve. Do not rely on electrical tape — it traps moisture and peels in a season.
Sealing the Camera Mount
The camera base or junction box mounts to a wall, and that mounting surface needs to be sealed too — especially on contoured siding.
Bed the Mount in Sealant
Run a bead of exterior silicone around the back edge of the mount before tightening it down, so water can’t get behind it. Leave a small gap at the bottom of the bead so any incidental moisture that does get behind can drain out rather than collect — you want to keep bulk water out while letting trapped moisture escape.
Use a Mounting Block on Siding
On lap siding, vinyl, or any contoured surface, a flat mount can’t seal against the uneven surface. Use a mounting block to create a flat, sealed surface the camera base can seat against properly. This also gives your fasteners solid backing.
Preventing Lens Fog and Condensation
A camera that fogs up internally every morning has a humidity problem, not a rain problem.
Don’t Open Sealed Cameras Unnecessarily
Quality cameras are sealed with a desiccant inside and often nitrogen-purged. Cracking the housing open in humid conditions lets moist air in that then condenses. If you don’t need to open it, don’t.
Manage Junction Box Condensation
Sealed enclosures can build internal condensation from daily temperature swings. A small drain gap at the lowest point lets that moisture escape instead of pooling on your connection. Seal against bulk water and bugs, but don’t trap humid air with no escape.
Position to Shed Water and Stay Shaded From Direct Spray
Mounting under a soffit or eave where practical shelters the camera and connections from direct rain and sun, reducing both water exposure and the temperature swings that drive condensation. It’s not always possible, but it helps when it is.
Common Mistake
Sealing a penetration with electrical tape — it fails in a season; use exterior silicone or a cable gland.
Whole-System Weatherproofing Habits
A few habits applied at every camera prevent the vast majority of water failures:
- Every penetration angled down and sealed. No exceptions.
- Every cable gets a drip loop before it enters a wall or connection.
- Every connection sealed in a junction box, with a cap kit or self-fusing tape.
- Every mount bedded in sealant with a bottom drain gap.
- Every enclosure allowed to drain at its lowest point.
Apply these five habits to every camera and water intrusion essentially stops being a problem.
Common Weatherproofing Mistakes
- Penetrations drilled level or angled up. Water runs straight into the wall. Always angle down to the outside.
- Relying on the camera’s IP rating alone. The camera is sealed; your field connections and penetrations are not. Seal them separately.
- Electrical tape on connections. It is not weatherproof. Use a cap kit or self-fusing tape.
- No drip loops. The cheapest protection there is — never skip it.
- Sealing enclosures airtight. Trapped condensation needs a drain. Leave a bottom gap.
- Flat mounts on contoured siding. They can’t seal. Use a mounting block.
The Bottom Line
Weatherproofing isn’t a single step — it’s a set of habits applied at every camera: angle and seal every penetration, leave a drip loop on every cable, seal every connection in a box with a proper cap or self-fusing tape, bed every mount in sealant with a drain gap, and let every enclosure breathe and drain. The camera comes sealed from the factory; your job is to seal everything you do in the field to the same standard. Spend the extra ten minutes per camera and your outdoor install will quietly survive every storm, season after season — which is exactly what separates a professional job from one that’s back on the ladder come spring.
Frequently Asked Questions
How do you weatherproof an outdoor security camera?
Seal everything you do in the field: angle each wall penetration downward and seal it with exterior silicone or a cable gland, leave a drip loop on every cable, seal the RJ45 connection in a weatherproof junction box with a cap kit or self-fusing tape, and bed the mount in sealant with a bottom drain gap.
What should I use to seal a camera cable hole?
Use exterior-grade silicone sealant or a proper cable gland (cord grip) that compresses around the cable jacket. Avoid cheap interior caulk, which fails under UV and temperature cycling, and never use electrical tape, which traps moisture and peels within a season.
Why does my outdoor camera keep fogging up?
Internal fogging is a humidity problem, not a rain problem. It usually means moist air got inside — often from opening a sealed housing in humid conditions — or that a junction box has no drain gap to let condensation escape. Dry it out, replace the gasket, and let enclosures drain at their lowest point.
Do I need a junction box for an outdoor camera?
It’s the cleanest way to protect the field-made RJ45 connection, which is the most vulnerable point in the install. A weatherproof (IP66+) junction box keeps the connection in a sealed, dry cavity. If you don’t use one, seal the connection directly with a cap kit or self-fusing tape.
Is a drip loop really necessary?
Yes — it’s the cheapest, easiest protection there is. Water travels along a cable by gravity and surface tension, so a downward loop before the cable enters the wall forces water to drip off at the low point instead of running into your penetration.
About the author
This guide was written and reviewed by the GuardSourceHQ Editorial Team. We research and hands-on test home-security gear so we can recommend only what we would use in our own homes. GuardSourceHQ helps homeowners choose, install, and troubleshoot security cameras and home networks.